I was digging through my gear bin last week looking for my crampons when I hit pay dirt: my old GoPro Hero 5 Black. It was buried under a pile of paracord and weathered carabiners, looking a bit scuffed but still fundamentally bulletproof. We’ve all been there. You upgrade to the latest Hero 12 or 13 for that sweet 5.3K resolution and horizon leveling, and your perfectly functional older model ends up gathering dust in a drawer.
But here’s the thing: these little boxes are over-engineered masterpieces of ruggedness. Even an older Hero 4 or 5 can handle vibration, heat, and impact better than almost any generic electronic device on the market today. If you’ve been eyeing a high-end 4K dash cam or a dedicated pet monitor, stop right there. Repurposing your old GoPro as a dash cam can save you anywhere from $150 to $300 compared to buying a dedicated high-end system. Plus, it gives your old gear a second life in the "real world" beyond the mountain peaks.
Introduction: Why Your Old GoPro is Still a Powerhouse
The action camera market has evolved, but the core "ruggedness factor" of the GoPro line remains unmatched. While a cheap $50 dash cam might melt under the summer sun on your windshield or glitch out the moment you hit a pothole, a GoPro is built to survive 30-foot drops and sub-zero temperatures.
These devices are designed for high-bitrate recording and wide-angle capture, which are exactly the specs you need for security and monitoring. By shifting your perspective from "obsolete action cam" to "high-performance utility sensor," you unlock a world of DIY tech possibilities. Whether you're navigating urban jungles or keeping an eye on a mischievous husky, that old Hero sitting in your drawer is a powerhouse waiting for a mission.
Setup 1: The Ultimate DIY Dash Cam
Turning a GoPro into a dash cam is the single most common "hack" for a reason—it works flawlessly. To use a GoPro as a dash cam, you simply need to mount it to your dashboard or windshield, connect it to a continuous USB power source (like your car’s cigarette lighter), and enable 'Looping' mode in the settings. This ensures the camera manages storage automatically by overwriting the oldest footage when the SD card is full.
Essential Gear for the Road
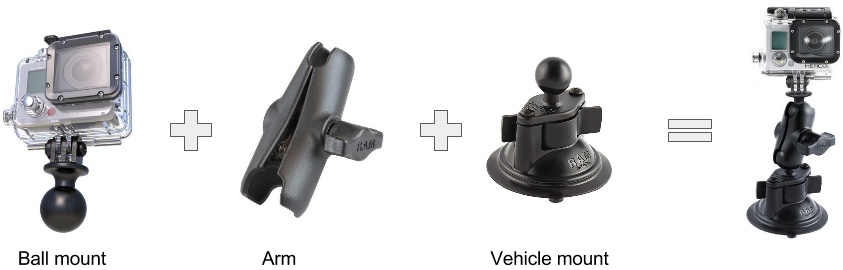
Choosing the right mount is the difference between professional-grade evidence and a shaky mess that falls off the glass during a sharp turn. I’ve tested everything from cheap knock-offs to industrial-grade rigs, and it usually boils down to three options:
| Mount Type | Best For | Stability Rating |
|---|---|---|
| Suction Cup | Windshield mounting; easy to move between vehicles. | High (if using official GoPro Suction) |
| Adhesive Flat Mount | Permanent dashboard placement; lowest profile. | Very High |
| Mirror Platform | Attaching directly to the rearview mirror stem. | Maximum (Zero vibration) |
Marcus’s Pro-Tip: The Battery Heat Hack If you live in a place like Arizona or even a humid mid-Atlantic summer, heat is your GoPro's enemy. When using it as a dash cam, remove the internal battery. Power the unit directly through the USB-C or Micro-USB port via a car adapter. This prevents the battery from overheating and expanding under the sun, which is the leading cause of "frozen" GoPros in vehicles.
Critical Settings for the Daily Commute
Don't just hit record. You need to dial in the settings to make it a "set-it-and-forget-it" tool.
- Looping Mode: Set the interval to "Max" or "20 minutes." This creates video segments that overwrite themselves.
- Resolution/FPS: 1080p at 30fps or 60fps is plenty for a dash cam and keeps the camera running cooler than 4K would.
- Field of View (FOV): Use "Wide" or "SuperView." You want to capture the entire span of the hood and the sidewalks.
- Auto Power On/Off: Some older models support this via "Wake on Power" settings (often found in the GoPro Labs firmware), allowing the camera to start recording the moment you turn the ignition.
Setup 2: Pet Cam & Home Security with GoPro Labs
Ever wonder what your dog does while you’re out buying kibble? Or perhaps you need a temporary security camera for a rental property? This is where the GoPro Labs firmware becomes your best friend.
For a GoPro pet cam, you have two paths: use the GoPro Fetch Dog Harness to capture point-of-view (POV) footage of their daily adventures, or install the GoPro Labs firmware to enable motion-triggered recording for home monitoring. This isn't just a gimmick—utilizing GoPro Labs motion detection firmware for home security can reduce SD card storage consumption by up to 85% compared to continuous 24/7 recording.
The Magic of GoPro Labs
GoPro Labs is a "secret" firmware for Hero 5 Session, Hero 7 Black, and newer models. It allows the camera to read QR codes to trigger specific actions.
- Motion Detection: You can set the camera to sleep until it detects movement. You can even set the sensitivity (on a scale of 1-9).
- Scheduled Recording: Want to monitor your front door only between 9 AM and 5 PM? You can program that with a single QR code scan.
The "Fetch" Setup
If you’re going for the POV route, the GoPro Fetch harness is a classic. It’s padded, adjustable, and features two mounting locations: one on the back for over-the-head shots, and one on the chest for "bone-chewing" perspectives. It’s a riot for social media, but also a great way to see if your pup is getting into areas they shouldn't.
Marcus’s Pro-Tip: The "Bark" Trigger With GoPro Labs, you can actually set the camera to trigger recording based on sound levels. If you have a dog with separation anxiety, you can set the camera to record a 30-second clip every time the noise level hits a certain decibel—perfect for seeing what’s triggering those midday howling sessions.
| Pet Cam Settings Checklist | Recommended Value |
|---|---|
| Firmware | GoPro Labs (Hero 7 or newer) |
| Motion Sensitivity | Level 5 (Standard) |
| Video Format | HEVC (for smaller file sizes) |
| Mount | GoPro Fetch or Magnetic Swivel Clip |
Setup 3: High-Definition Pro Webcam
Most built-in laptop webcams are, frankly, terrible. They’re grainy, struggle with backlighting, and make you look like you’re calling from a basement in 2004. Your old GoPro can fix that. To use a GoPro as a webcam, you need a Hero 8 Black or newer model, the GoPro Webcam app installed on your computer, and a high-quality USB-C cable for high-definition video conferencing.
Compatibility & Workarounds
If you have a Hero 8, 9, 10, 11, or 12, the setup is plug-and-play via the GoPro Webcam desktop utility. However, if you have an older model like the Hero 7 or Hero 5, don't worry—you can still use it. You’ll just need a "Media Mod" or a cheap HDMI-to-USB video capture card (you can find these for about $15 online). Connect the GoPro's Micro-HDMI out to the capture card, and your computer will recognize it as a standard USB camera.
Setup Steps for the Perfect Meeting
- Firmware Update: Ensure your GoPro is running the latest firmware via the Quik app.
- Install the App: Download the GoPro Webcam desktop utility (available for macOS and Windows).
- Connect: Plug the GoPro into your computer via USB-C. You’ll see a blue dot on the camera's screen indicating "Webcam Mode."
- Lens Selection: This is the game-changer. Switch between Wide (great for whiteboards or group meetings) and Linear (best for one-on-one calls as it removes the fisheye distortion).
Marcus’s Pro-Tip: Lighting is King Even a Hero 12 will look mediocre in a dark room. Position your GoPro so you are facing a window, or grab a cheap LED ring light. Because GoPros have relatively small sensors compared to DSLRs, they crave light. Give them enough, and you'll have the crispest video in the Zoom call.
Expert Tips for All Setups
No matter which way you choose to repurpose your old GoPro, there are a few "pro-level" hurdles you'll need to clear to ensure the setup lasts.
1. Vibration Control
If you're using your GoPro as a dash cam in a vehicle with stiff performance suspension or on off-road trails, the footage can get "jittery." While older GoPros have HyperSmooth, it's not always enough for micro-vibrations. Use a mount with a rubber gasket or a "vibration dampener" often used by motorcycle riders. This preserves the internal image sensor and keeps your footage watchable.
2. Audio Fixes
GoPro’s internal mics are "okay" for catching the wind in your hair, but they're not great for social media narration or security evidence. If you’re using the camera for a pet cam or dash cam and want to hear clearly, consider a cheap external lavalier mic. Note: For Hero 5 through Hero 7, you’ll need the (admittedly bulky) GoPro Pro 3.5mm Mic Adapter.
3. SD Card Health
Continuous recording is hard on memory cards. If you’re using your GoPro as a 24/7 dash cam, you need a "High Endurance" SD card. These are specifically designed for thousands of write/erase cycles. Standard cards will often fail within a few months of dash cam use.
FAQ
Can I use a GoPro Hero 4 as a dash cam? Absolutely. While the Hero 4 lacks the built-in "Looping" UI of newer models, you can still find the Looping setting in the video sub-menus. It won't have the stabilization of newer models, but for a dash cam, it’s more than sufficient to prove who was at fault in an accident.
Does continuous recording damage the battery? It doesn't "damage" it in the short term, but it does generate significant heat. As mentioned, if the camera is stationary (like a dash cam or webcam), I highly recommend removing the battery and running it off wall or car power to extend the life of the electronics.
Is it legal to mount a GoPro on my windshield? Legality varies by state and country. In many places, you cannot have anything obstructing the "critical field of view" of the driver. Usually, mounting it behind the rearview mirror or in the bottom corner of the windshield is legally acceptable. Always check your local DOT regulations.
Ready to Give Your Gear a Second Life?
There’s a certain satisfaction in making old tech do new tricks. Before you head out and drop a couple of hundred dollars on a dedicated device, give your old GoPro a weekend of "probationary duty" as a dash cam or a pet monitor. You’ll likely find that its durability and video quality still outclass the competition.
Don't let that rugged little camera stay buried in your gear bin. Clean the lens, wipe the SD card, and get it back into the action—even if the "action" is just your morning commute or watching your dog sleep.